"I Just Got My Loom, Now What?" Part 1
This is the first in 3 part blog series suggesting first time projects using box store yarns on your new rigid heddle loom with the default 7.5/8 dent heddle.
Your first few projects with the loom will generally determine whether you like weaving or not. I think we all start a craft with an idea in our head of what we desire to make, then in the process of learning, we shore up the canyon of reality and imagination. If that process takes too long with little success, it is natural we will give it up. With knitting and crocheting, we learn one stitch at a time and poor stitches can be easily pulled out and redone. There are also many beginner patterns and endless videos and teachers to help with the process.
With rigid heddle weaving, the process is different. You need to clear the floor, so to speak, and really commit to getting the loom warped. Once it’s warped, changes can’t be made to the design very easily. When you weave, it is exactly like a computer program: warping is the code, you are the machine running the program.
This need to commit, combined with the issue that yarn companies don’t supply weaving recommendations and the relative lack of specific projects made for the rigid heddle leaves a new weaver wondering what their first project should be. And though there are lovely companies that make amazing weaving yarns, and wonderful LYS everywhere, many of us are both geographically and financially stuck with box store yarns while we test the waters.
I have created a few projects that are perfect for those first few weaving projects. My criteria are that these designs are cheap, fast, and offer a few challenges that will help you design your own projects in the future. If they aren’t beauties, and you don’t like them- I want you to leave the process with tools for a great next project.
I will not offer full warping instructions here. There are many great teachers that discuss this and many videos. There are different methods and I think you should simply try the one that looks the easiest to you. I think I learned with this video from Ashford, except I have to warp on solo so I use the “crank and yank” method.
The project: Mandala Scarf
Supplies:
1 ball of Lion Brand Mandala yarn
7.5 or 8 dent heddle
About the Yarn: Mandala is a multicolored yarn that offers a lot of yardage (590 yards) per ball and at least 6 colors in each cake. It retails for around $9, and is often on sale and usually offered at large chain stores that carry Lion Brand yarn (as of this post writing).
The color changes are not gradients, but abrupt transitions that create large, color block patterns in weaving. Some weavers will unwind the ball and make mini-balls of different colors and design their own stripes and plaids. I used the ball as is in this project, but it’s not more difficult to warp and weave with many small color balls - it just depends if you have the patience to rewind the whole ball before getting it on the loom.
Mandala is an American size 3 yarn, often called DK weight in the knitting world. It is much thinner than an average worsted, yet blooms (meaning it expands when washed and dried). This makes it a yarn that can be woven on both the 7.5/ 8 dent heddle and a 10 dent heddle. You will encounter this yarn size a lot and it’s a skill to know which size 3/dk weights go well on the larger heddle and which need a smaller one. Personally, I would likely do my own Mandala projects on a 10, but working with it on the larger heddle gives you a TON of challenges that will set you up for great projects in the future, but it’s forgiving enough to be appropriate for new weavers.
Many people dislike acrylics and I will have some natural fiber projects coming up next. I learned a new respect for acrylics after weaving: they are affordable, adaptable, and they wash and wear very well in woven items. There is no way I could have afforded becoming the confident weaver I am without dozens of projects completed on clearance table acrylics. Now that I am more skilled, I feel better about using better quality yarns and can justify the cost because I can design more intuitively and with confidence.

Warping and Calculations
You can skip this part if you just want to get on with it- but remember this is here for when you have a new ball of yarn and you don’t know how far it will go in your project. There are a few yardage calculators out there, but this is my process so I can get a ballpark idea of how much yarn I need on the go without a spreadsheet.
Step 1: Convert yards to inches (or meters to centimeters for those of you in logical countries).
590 yards is 21,240 inches.
Step 2: Divide this number in half
Your ball of Mandala needs to be both warp and weft. It’s not always even, sometimes you need more weft than warp, sometimes more warp than weft. But in general, for most projects where you are aiming to have a balanced weave - dividing your yarn amount by 2 will give you a ballpark estimate for how much you need of both. If you have a project that needs to be a specific size, always allow extra yarn and don’t rely on this estimation! In this project, if I made a scarf that weaves up 6 inches longer or shorter, it won’t matter much. I just want to know if a ball of 590 yards will give me an average-sized scarf on a 7.5 dent heddle, so dividing it in half will be close enough to give me an idea if this is possible.
21,240 inches divided by 2 is 10,620.
I have 10,620 inches for warp and 10,620 inches weft. Let’s see how long and wide my warp can be.
Step 3: Divide your total inches by the EPI of your heddle.
This is where it gets hard to visualize because you are taking something linear like a string and adapting it to an area. But trust the process and just divide the inches of warp you have by the epi of your heddle.
10. 620 divided by 7.5 is 1416 .
1416 is your magic number- this is the square inches your warp can be. If you used one inch of yarn in each dent and your warp was 1 inch long, it could be 1416 inches wide. Now you can play with this number to find your warp length.
Step 4: Divide your “magic number” by either the length of warp you want or the width you want.
Do you remember in school when you had to find the area of a square? That is basically the calculation you are playing with here.
Your rectangle can be 1416 square inches. Let’s say I want a warp that is 15 inches wide on the loom.
1416 divided by 15 is about 94 inches.
As long as my warp is less 94 inches long, I can have a scarf that is 15 inches wide in my heddle using the yarn I have.
Great! So my final weaving will be 15 x 94.4 inches long! Nope.
This is just my maximum warp dimensions, not my finished project size. I need to allow for fringe, take up, shrinkage and waste.
Fringe is a decorative element at the ends of the weaving.
Take-up and shrinkage are the reductions of the warp as it interlaces around the weft and reacts to being washed. If you want to get really into it look at Liz Gibson’s post here. Generally, I don’t worry about calculating take up because it varies so much between yarn and structure. In this project I am letting the yarn determine my project size so it’s going to be what it’s going to be. This calculation is important for when you know your final project size, but need to design it on the loom and determine how much yarn to buy and how long your warp needs to be- which is a different design process than just seeing what your yarn skein is capable of making and you have lots of flexibility for the size of your finished project.
Waste is the unweavable parts of your warp- the parts that get cut off or are used in tying and your header. Waste can vary between project and loom and weaver. I allow for a generous amount in my projects but I am able to weave with just 6 “ of waste if I need to. Here, I am going to allow about 15”.
94” minus 10“ fringe & 15” loom waste = about 69 inches of total weaving space. The final project will be likely 10-15% smaller after it’s washed and dried. I can expect my weaving to be about 58-62” long with 10” of fringe. This seems fine to me! So I will go ahead and move my peg (or chair in my case) around 90” away from my loom and warp away.
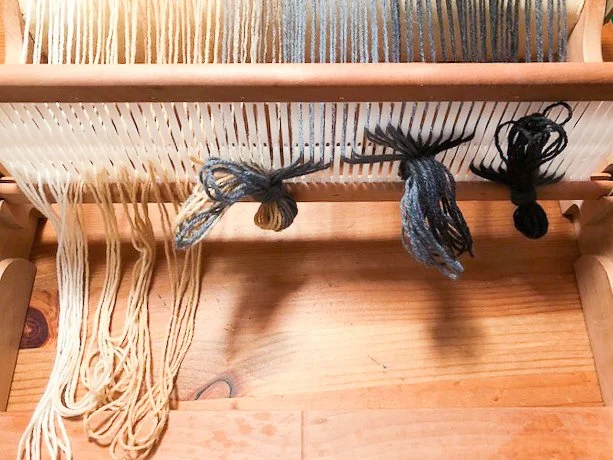
Warp is rolled on the back beam and ready to be threaded into the heddle holes. Slip knots keep ends tidy and prevent the heddle from falling forward.

The remaining yarn after warping on. We are almost ready to weave!
Remember how I said this yarn has a healthy dose of challenge? Below, on the left you can see my messy edges and uneven threads going across the warp. I have been weaving for years and I am getting some immediate feedback about how I need to adjust to my weaving. After several inches, it did get better.
For an early project, this might seem like cruel punishment, but the scarf is long, the yarn is cheap. Every toss of the weft you are learning and some of this will wash out in the finishing.


I was able to weave the scarf in a few hours. For the hemstitch, I used this tutorial. I have a hard time adapting hemstitch instruction to the four possible directions your stitch can go, so I might do a blog post on that showing the stitch sequence from all possible directions- right to left, left to right, repeated on the top and bottom of the weaving.
I finished with a twisted fringe. Even for cheap yarns I think it’s worth it to honor your weaving with a twisted fringe. I finally got a fringe twister this year and I am kicking myself for not doing it sooner!
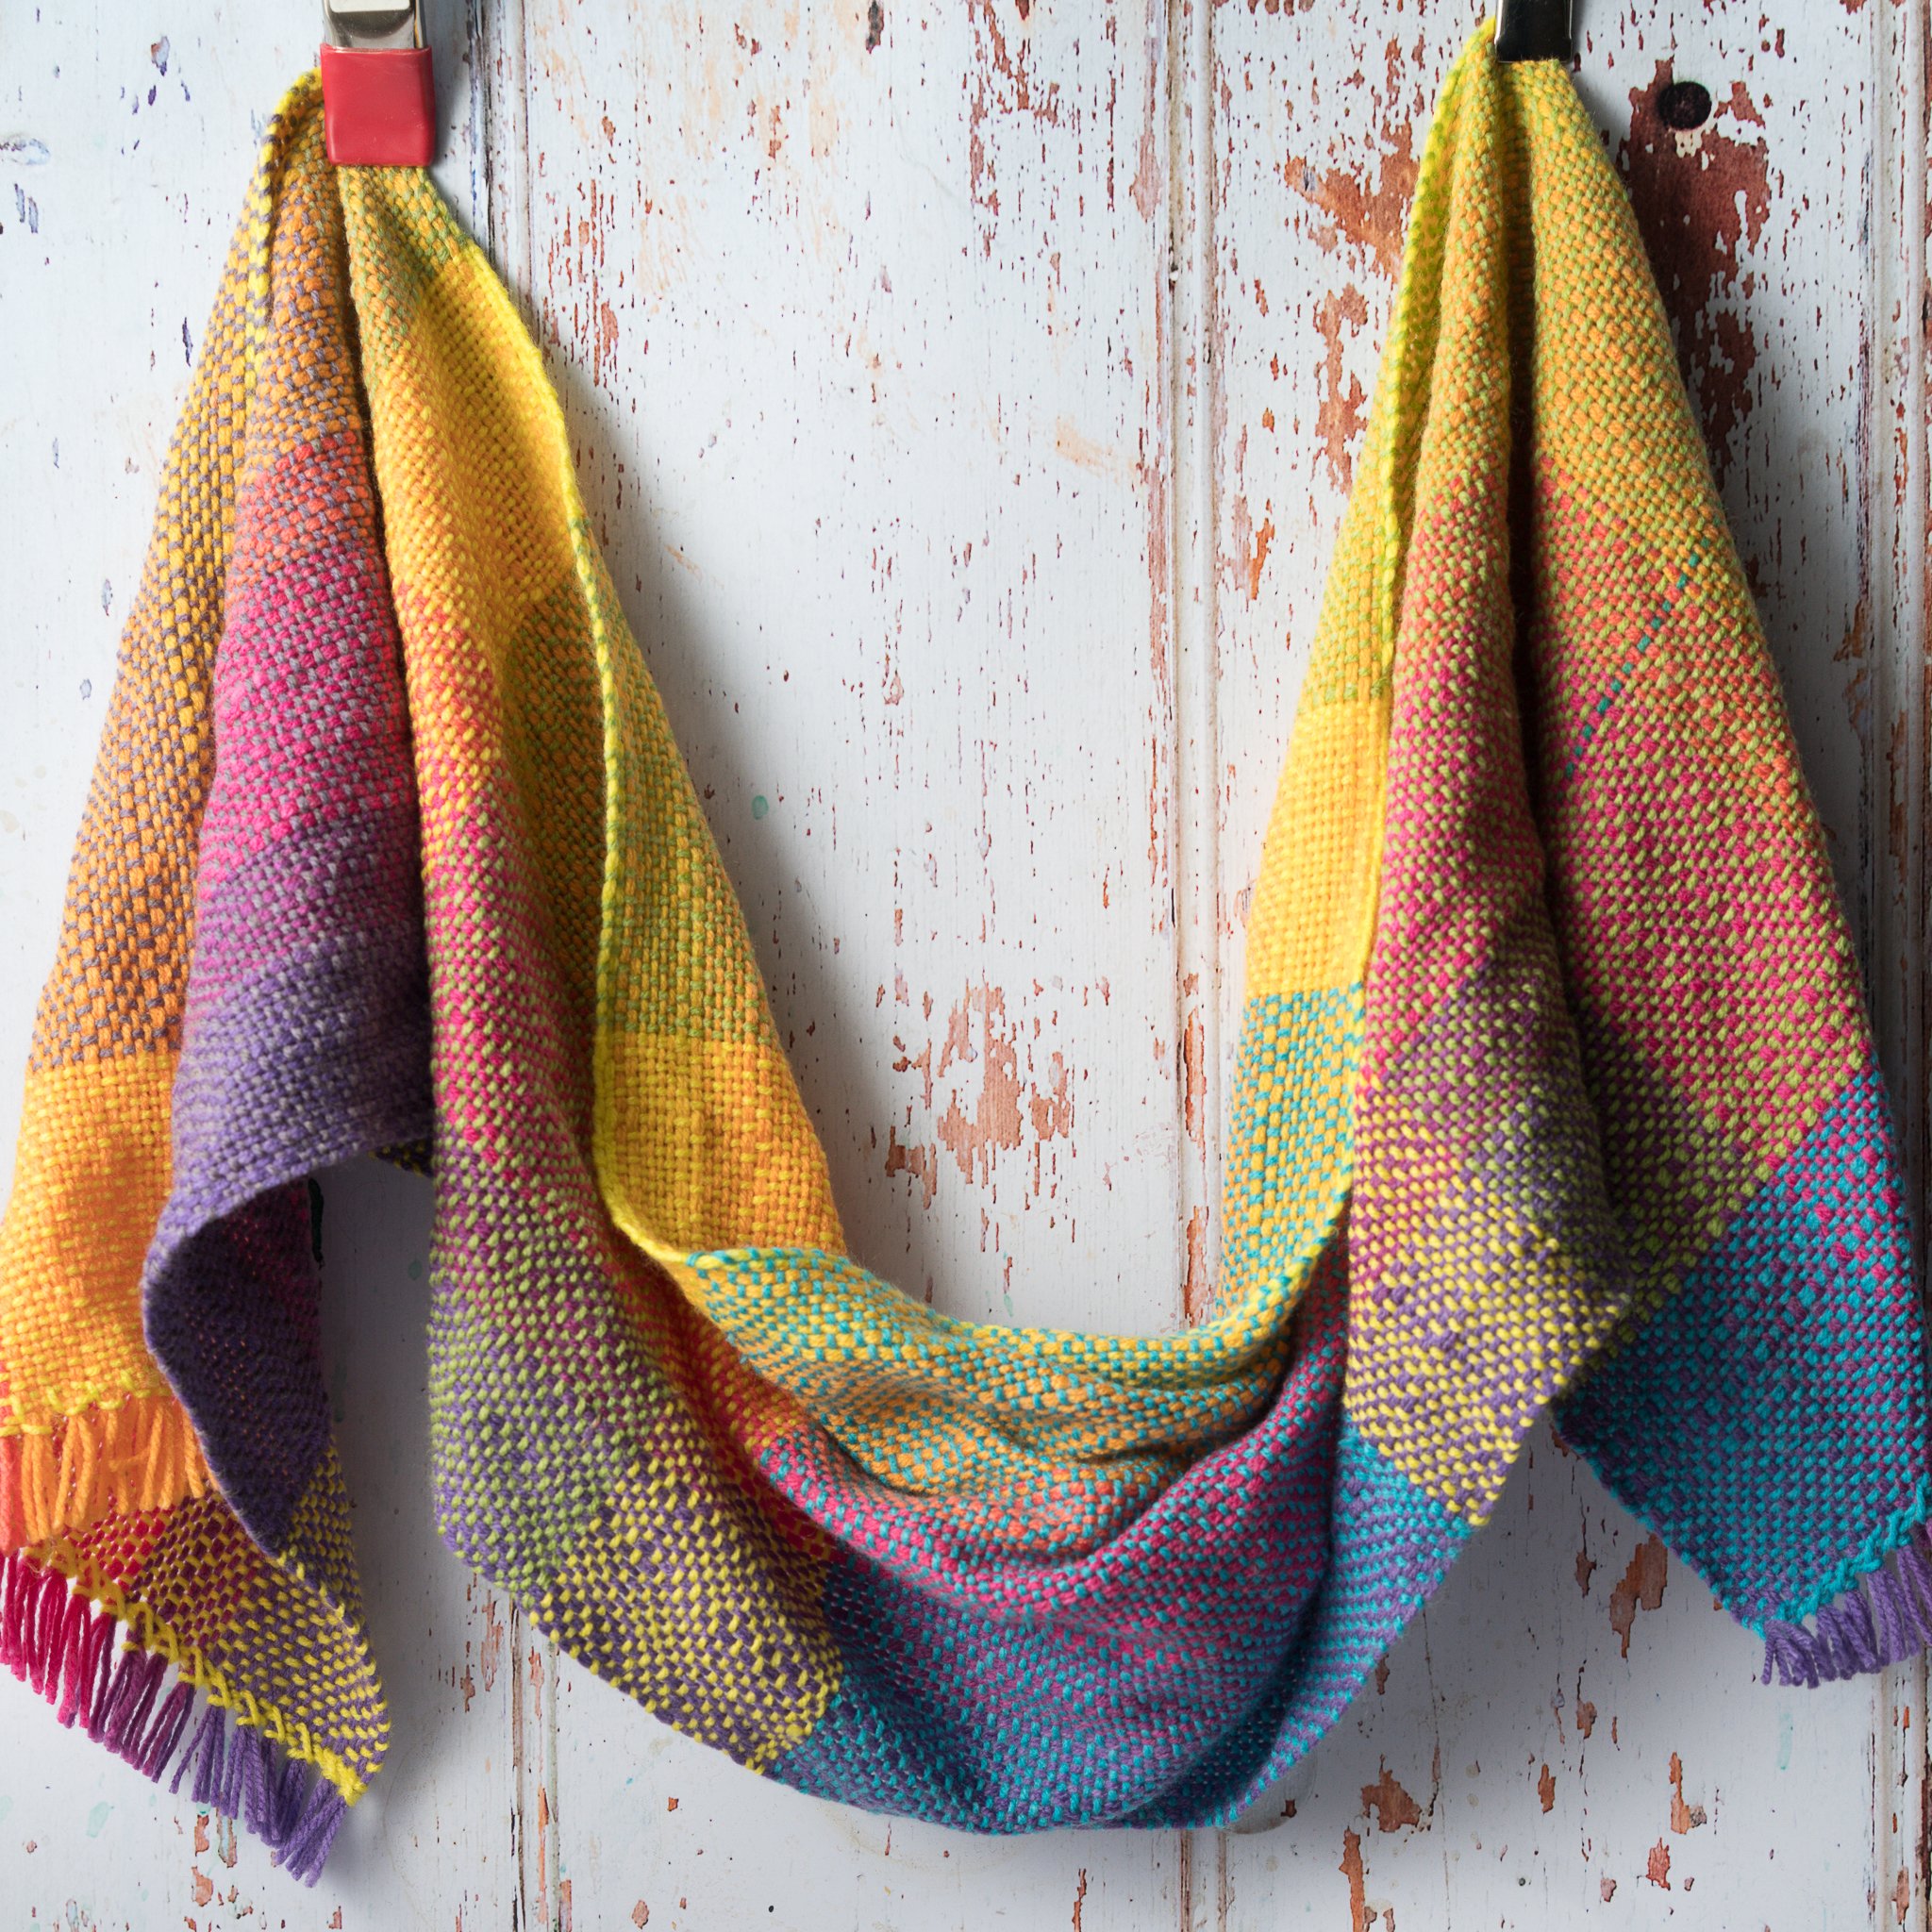
Below you can see the final product, before and after wet finishing. When I wet finish I almost always wet finish in the way the piece is meant to be laundered- so here I hand-washed and machine dried to encourage the yarn to bloom.

Before wet finishing.

After wet finishing
Let’s follow up on everything- even if you never actually do the project, you can still learn. As Liz Gibson says, weaving in your head counts!
My finished piece is about 63” long before the fringe and 15” wide. It did shrink warp-wise after wet-finishing by 2 inches- but the finished length approximates my calculations!
In this one project, we covered so much: calculating your warp from your available yarn, keeping your beat even, and perfecting your selvages. Then in the end you get an extra surprise: you basically made yourself a color gamp that explores how yarn colors interplay! Color gamps are sample weavings that explore color interaction and they are works of art in themselves. Looking at the yarn below, think about how they interplay in the finished scarf. Is it what you would expect?

This colorway is called Serpent
I had so much fun with this project, I headed back to the store to pick up another cake of yarn while it was still on sale. This time when I warped I added two extra threads for every 4 passes, a method inelegantly called “cramming”. This meant that every 6 warp threads I added an extra thread in both the hole and the slot so they had two threads instead of one. You will see this added more texture to the weaving and it gave a closer sett without needing to buy another heddle. Cramming is a lovely tool in your rigid heddle weavers toolbox! Here I did it with some regularity so it gives the impression of ridges, but it’s also fun to add extra warp at random.
When I did my weft I divided the remaining yarn after warping onto three shuttles so I could create more color changes as I went. Once again, look at how the colors work together becoming something worth more than the sum of it’s parts. On the loom it felt like I was weaving a camp craft project, but the finished item is a fun and funky scarf perfect for a kids.
Before wet finishing

After wet finishing

This colorway is called Gnome.
I hope you had fun following along with this project and you feel more confident trying this yarn on your loom. For my next idea I picked up some wool so we can play with felting and color work. Even your first few projects can things you enjoy as you learn your way around the rigid heddle!